Exercise and answers
Overview
In this mini-workshop you will familiarize yourself with TADbit (Serra et al., 2017): from FASTQ files to contact matrix and beyond.
A Primer into 3D Genomics: A Mini-Workshop
Juan Antonio Rodríguez, Globe Institute, University of Copenhagen
9 January 2026, DTU
Outline of the exercises
- Preprocess Hi-C FASTQ data
- Index reference genome
- Use TADbit to:
- Map reads to reference genome (
map) - Get intersection (
parse) - Filter reads (
filter) - Normalize (
normalize) - Generate matrices (
bin) - Export formats (
bin+cooler)
- Map reads to reference genome (
Slurm / sbatch on the cluster
The cluster uses Slurm to schedule jobs. Instead of running long commands directly in the terminal,
you write a small script (an .sbatch file) that requests resources (time, CPUs, memory) and runs your commands.
Slurm decides when and where your job runs so users don’t interfere with each other.
After you submit a job you can safely disconnect without your job crashing (similar idea to screen).
Slurm writes standard output and errors to log files, so you can always see what happened.
sbatch myjob.sbatch— submit a job (returns a<job_id>)squeue -u $USER— check your jobsscancel <job_id>— cancel a job
Setup conda environment to run TADbit later
You may get notified something is missing — just accept.
cd;  # Home folder
cp /home/projects/22126_NGS/exercises/3D_GENOMICS_COURSE/SCRIPTS/setup_TADbit.sh .;
bash ./setup_TADbit.sh
You should get (as the only output) the help from the program — this means the environment is up and running.
Make yourself familiar with the directory structure. Inside
/home/projects/22126_NGS/exercises/3D_GENOMICS_COURSE we have three folders:
fastq– raw dataSCRIPTS– scripts to run TADbitrefGenome– reference genome raw FASTA and indexed files
Index reference genome
Before analyzing Hi-C data through TADbit, index the reference genome that GEM mapper will use.
This is standard for most mappers (e.g., bwa, bowtie2). We can call the gem-indexer
from within the TADbit environment.
Remember to activate the tadbit conda environment.
# Move to your home
cd;

# Activate TADbit environment
eval "$(/home/ctools/miniconda3/bin/conda shell.bash hook)"
conda activate "$HOME/envs/tadbit_course"

# Make a WORKING folder for the course
mkdir -p 3D_GENOMICS_COURSE;
cd 3D_GENOMICS_COURSE;

# Make SCRIPT folders (to store your own scripts)
mkdir -p SCRIPTS;
mkdir -p SCRIPTS/log

# Make RESULTS folder
mkdir -p tadbit_dirs;

# Make REFERENCE GENOME folder
mkdir -p refGenome;

# To store logs from fastp
mkdir -p fastp_reports

# For the fastq
mkdir -p fastq
mkdir -p fastq/clean
Putting things into an SBATCH script
A template for sbatch job submission is provided. Copy it to your SCRIPTS folder:
cp /home/projects/22126_NGS/exercises/3D_GENOMICS_COURSE/SCRIPTS/template.sbatch \
  /home/people/${USER}/3D_GENOMICS_COURSE/SCRIPTS/
Move to your SCRIPTS folder and make a copy called 00_index.sbatch:
cd /home/people/${USER}/3D_GENOMICS_COURSE/SCRIPTS/;
cp template.sbatch 00_index.sbatch
Open the new copy with your favourite editor (for example: emacs 00_index.sbatch)
and paste the following at the bottom of the file after the existing #SBATCH ... lines.
data_dir=/home/projects/22126_NGS/exercises/3D_GENOMICS_COURSE
cd ${data_dir}

# Running the indexer
# Note: the output is just a *prefix*; no file extension needed.
gem-indexer -t 11 \
  -i refGenome/GCF_000002315.6_GRCg6a_genomic.fna \
  -o /home/people/${USER}/3D_GENOMICS_COURSE/refGenome/GCF_000002315.6_GRCg6a_genomic
If you were to run this, you would submit the job with:
sbatch 00_index.sbatch
⚠️ NO NEED TO RUN THIS. WE WILL GENERATE A SYMBOLIC LINK INSTEAD.
We make a symlink to the reference genome in our folder so that we do not have to copy it:
ln -s /home/projects/22126_NGS/exercises/3D_GENOMICS_COURSE/refGenome/GCF_000002315.6_GRCg6a_genomic.gem \
  /home/people/${USER}/3D_GENOMICS_COURSE/refGenome/GCF_000002315.6_GRCg6a_genomic.gem

ln -s /home/projects/22126_NGS/exercises/3D_GENOMICS_COURSE/refGenome/GCF_000002315.6_GRCg6a_genomic.fna \
  /home/people/${USER}/3D_GENOMICS_COURSE/refGenome/GCF_000002315.6_GRCg6a_genomic.fna
Pre-process Hi-C FASTQ data: minimum QC
While the indexing step would run, start looking at the data and pre-process it.
Hi-C FASTQs are paired-end reads. We will “clean” the reads from adapters,
low-quality bases, and short reads using fastp.
Create 01_fastp.sbatch from the template:
cd /home/people/${USER}/3D_GENOMICS_COURSE/SCRIPTS/;
cp template.sbatch 01_fastp.sbatch
Open 01_fastp.sbatch and paste the following at the bottom (after the #SBATCH lines):
cd /home/people/$USER/3D_GENOMICS_COURSE/fastq
sample="liver"
FASTQ_DIR="/home/projects/22126_NGS/exercises/3D_GENOMICS_COURSE/fastq"

# Launch fastp: raw reads are read from course folder, clean fastqs are stored in your folder.
# Enable adapter detection; trim the first 5 bases (often lower quality).
# Use 4 threads and minimum read length 30 (remove reads shorter than this after trimming).
fastp \
  -i ${FASTQ_DIR}/${sample}_R1.fastq.gz \
  -I ${FASTQ_DIR}/${sample}_R2.fastq.gz \
  -o clean/${sample}_R1.clean.fastq.gz \
  -O clean/${sample}_R2.clean.fastq.gz \
  --detect_adapter_for_pe \
  --trim_front1 5 \
  -w 4 \
  -l 30 \
  -h ${sample}.html
Submit the script to the queue:
sbatch 01_fastp.sbatch
When it finishes, copy the HTML report to your local computer and open it in a browser
(replace SERVER and USER as needed):
scp USER@SERVER:/home/people/USER/3D_GENOMICS_COURSE/fastq/liver.html .
⏰ It should take ~1 min to complete.
Question: Check the HTML report. What percentage of reads are kept?
Answer: It should be about ~96.4%. No massive adapter content or low quality sequences. After mapping we will inspect ligation/digestion patterns in more detail.
Mapping to the reference genome
TADbit maps each read separately, so we run tadbit map twice (once per read).
It requires the restriction enzyme(s) used in the experiment. These samples were treated with two enzymes.
Create 02_map.sbatch from the template and add the commands below (paste at the bottom after #SBATCH lines).
cd /home/people/${USER}/3D_GENOMICS_COURSE/SCRIPTS/;
cp template.sbatch 02_map.sbatch
cd /home/people/$USER/3D_GENOMICS_COURSE/

sample="liver"
ref="refGenome/GCF_000002315.6_GRCg6a_genomic.gem"
wd="tadbit_dirs/${sample}"
mkdir -p ${wd}

# Two enzymes used in this experiment (double digestion)
enz="MboI HinfI"

# Map read 1
rd=1
tadbit map \
  --fastq fastq/clean/${sample}_R${rd}.clean.fastq.gz \
  --workdir ${wd} \
  --index ${ref} \
  --read ${rd} \
  --renz ${enz} \
  -C 6

# Map read 2
rd=2
tadbit map \
  --fastq fastq/clean/${sample}_R${rd}.clean.fastq.gz \
  --workdir ${wd} \
  --index ${ref} \
  --read ${rd} \
  --renz ${enz} \
  -C 6
Submit the job:
sbatch 02_map.sbatch
If you want to inspect the job output, check the log files in SCRIPTS/log (or the directory where you submitted the job,
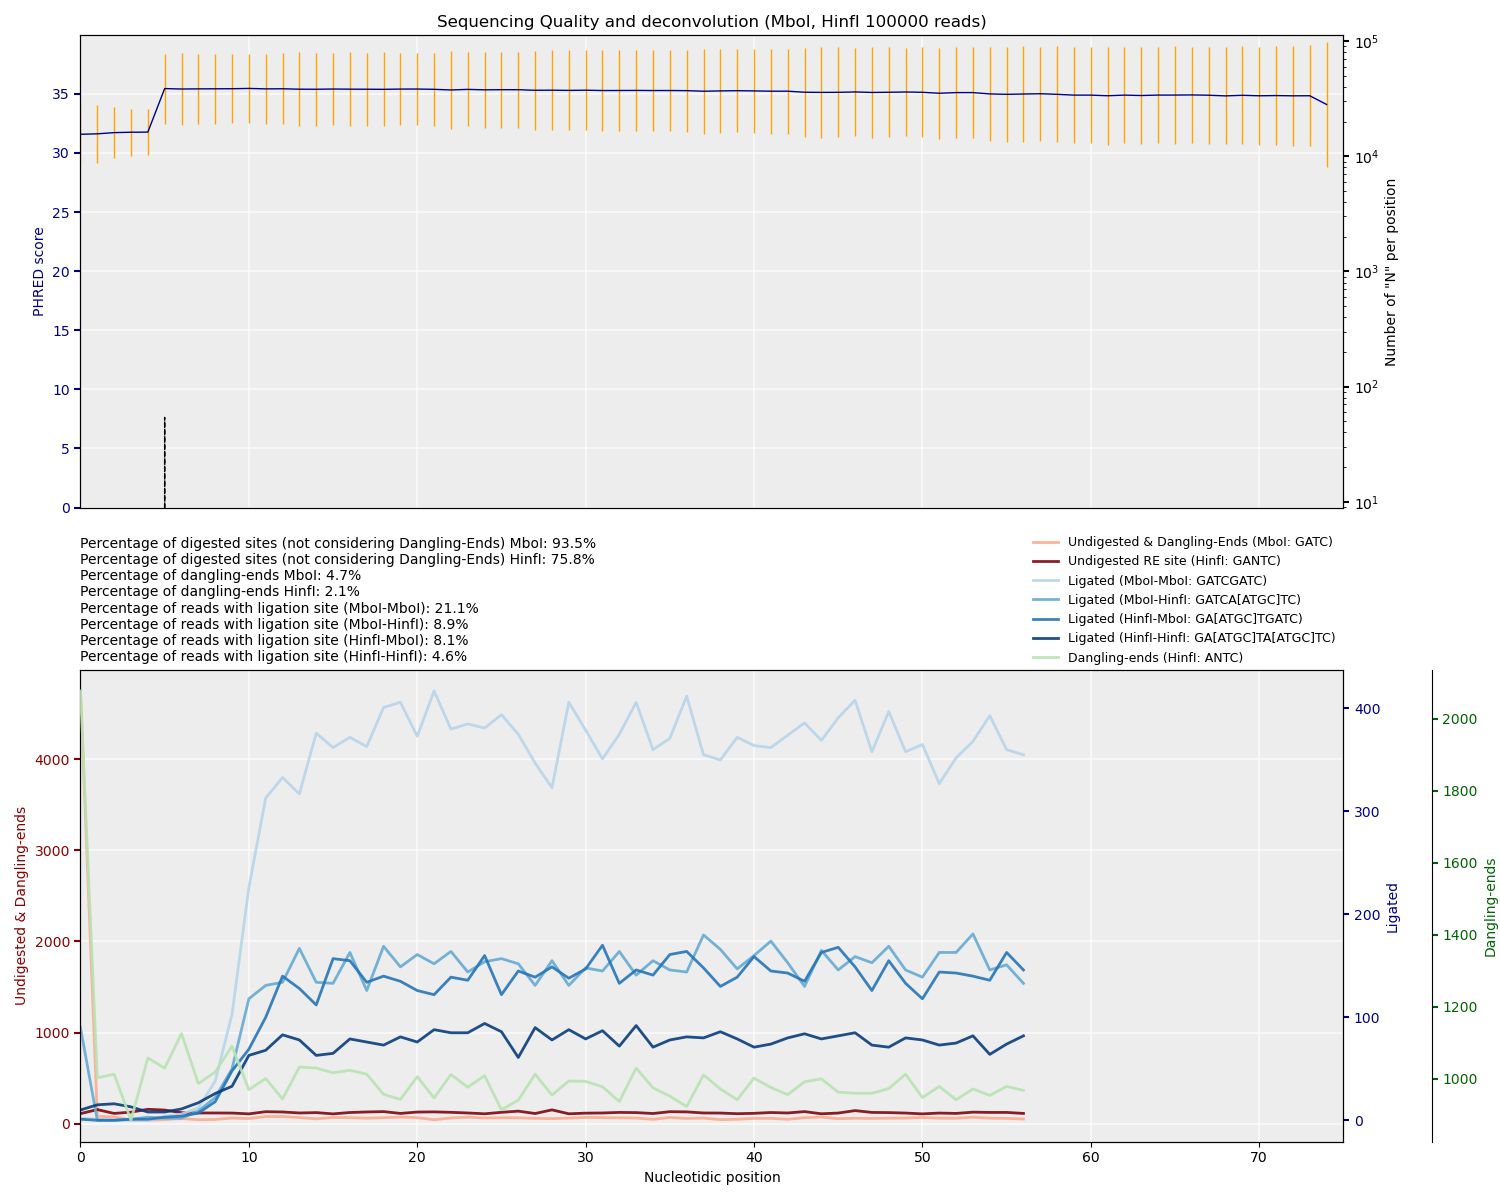
depending on the template). TADbit also produces PNG plots inside tadbit_dirs/liver/.
After mapping, inspect the plots TADbit generates. Discuss the number of digested sites, dangling ends, and ligation efficiency.
Question: How may restriction enzyme choice influence the experiment? ✂️
Answer: Cutting frequency differs between 4-cutters and 6-cutters and influences fragment size distribution, ligation probabilities, and contact resolution. Using two enzymes increases the diversity of ligation junctions. Compare with Micro-C, which uses MNase digestion, so it cuts evenly through the genome.
Useful background figures (open locally):
Finding the intersection of mapped reads (parse)
Each mate of a Hi-C pair originates from the same digested/ligated fragment (unless it is a dangling end).
We identify pairs and build fragment associations with tadbit parse.
Note on runtime: this step can be quick or can take longer depending on load and filesystem performance. Try to get it launched, then continue reading / looking at the provided plots while it runs (this is a good time for a break).
⚠️ Note: The chromosome prefixes to filter have to be defined in the reference genome FASTA file beforehand.
It will only match chromosomes that start with the string in --filter_chrom.
Create 03_parse.sbatch from the template and (important!) update the template to request 10 CPUs
(e.g. change #SBATCH -c 4 to #SBATCH -c 10), then paste the commands below at the bottom.
cd /home/people/${USER}/3D_GENOMICS_COURSE/SCRIPTS/;
cp template.sbatch 03_parse.sbatch
cd /home/people/$USER/3D_GENOMICS_COURSE/
sample="liver"
ref="/home/people/$USER/3D_GENOMICS_COURSE/refGenome/GCF_000002315.6_GRCg6a_genomic.fna"
wd="tadbit_dirs/${sample}"

tadbit parse \
  --workdir ${wd} \
  --genome ${ref} \
  --filter_chrom "chr.*" \
  --compress_input
Submit the job:
sbatch 03_parse.sbatch
Question: Is it possible to retrieve multiple contacting regions?
Answer: Consider complex ligation products (read pairs mapping to different fragments in the same molecule, i.e., multiple contacts) and multi-mapping artifacts; TADbit focuses on valid pairs as operationally defined by the filters. Multi-contact methods (e.g., Pore-C, SPRITE) address this explicitly, but standard Hi-C largely models binary contacts per ligation event. We can view it on the bam file in the next step.
Filtering interactions
TADbit allows flexible filtering of non-wanted interactions. In many cases, the defaults work well across datasets. To see what the filter numbers mean, check:
tadbit filter --help
Run filtering (you can run in an sbatch script or interactively):
cd /home/people/$USER/3D_GENOMICS_COURSE/
sample="liver"
wd="tadbit_dirs/${sample}"

tadbit filter \
  --workdir ${wd} \
  --apply 1 2 3 4 6 7 8 9 10 \
  --cpus 6
Check the amount of filtered data and past commands
tadbit describe summarizes what has been done so far in the workdir,
and reports counts, numbers, and parameters after each step.
cd /home/people/$USER/3D_GENOMICS_COURSE/
sample="liver"
cd tadbit_dirs/$sample

tadbit describe . | less
Question: How many valid pairs do we keep?
Answer: Check the “valid pairs” section of tadbit describe after filtering to get the exact count and percentage.
Question: The total number of filtered reads is not equal to the initial number of reads… Why?
Answer: Because a read pair can be assigned to more than one category (e.g., a dangling end that is also a duplicate). Categories are not mutually exclusive, so percentages can overlap.
To normalize or to not normalize
In the filter step we have catalogued all the reads into categories — so it actually didn’t filter anything yet. It is during normalization that we specify which categories to include/exclude so the normalization is performed accordingly.
Normalization in TADbit extracts a bias vector (one value per bin) which adjusts interaction intensities depending on coverage and technical biases.
Important: During normalization is where bad columns (low counts, low mappability, etc.) are removed from the matrix.
Several normalization strategies exist (see: tadbit normalize --help).
A simple and commonly used option is to filter based on a minimum number of counts per bin.
If you want to exclude specific genomic regions, use the --badcols parameter.
Create an sbatch script (e.g. 04_norm_vanilla.sbatch) if you like, then paste the commands below at the bottom.
cd /home/people/${USER}/3D_GENOMICS_COURSE/SCRIPTS/;
cp template.sbatch 04_norm_vanilla.sbatch
cd /home/people/$USER/3D_GENOMICS_COURSE/

sample="liver"
wd="tadbit_dirs/${sample}"

# Define the resolution
res="100000"  # 100 kb

# Normalization method
norm="Vanilla"

# Minimum number of counts required per bin
min_count=100

tadbit normalize \
  -w ${wd} \
  -r ${res} \
  --cpus 6 \
  --filter 1 2 3 4 6 7 9 10 \
  --normalization ${norm} \
  --badcols chrW:1-7000000 chrZ:1-83000000 \
  --min_count ${min_count}
Submit it:
sbatch 04_norm_vanilla.sbatch
Use tadbit describe to check how many bins were removed.
A good rule of thumb: remove ~3–4% of bins. If much more is removed, something may be wrong.
Optional reading on normalization strategies:
Overview article on Hi-C normalization strategies
Binning and viewing matrices
Once normalization is done, we can visualize Hi-C matrices. Using -c restricts the plot to a specific chromosome or region.
This step can take a while, so using an sbatch script is recommended.
cd /home/people/${USER}/3D_GENOMICS_COURSE/SCRIPTS/;
cp template.sbatch 05_bin_chr1.sbatch
cd /home/people/$USER/3D_GENOMICS_COURSE/
sample="liver"
wd="tadbit_dirs/${sample}"
res="100000"
chrom="chr1"
norm="Vanilla"

tadbit bin \
  -w ${wd} \
  -r ${res} \
  -c ${chrom} \
  --plot \
  --norm ${norm} \
  --format "png" \
  --cpus 6
Submit it:
sbatch 05_bin_chr1.sbatch
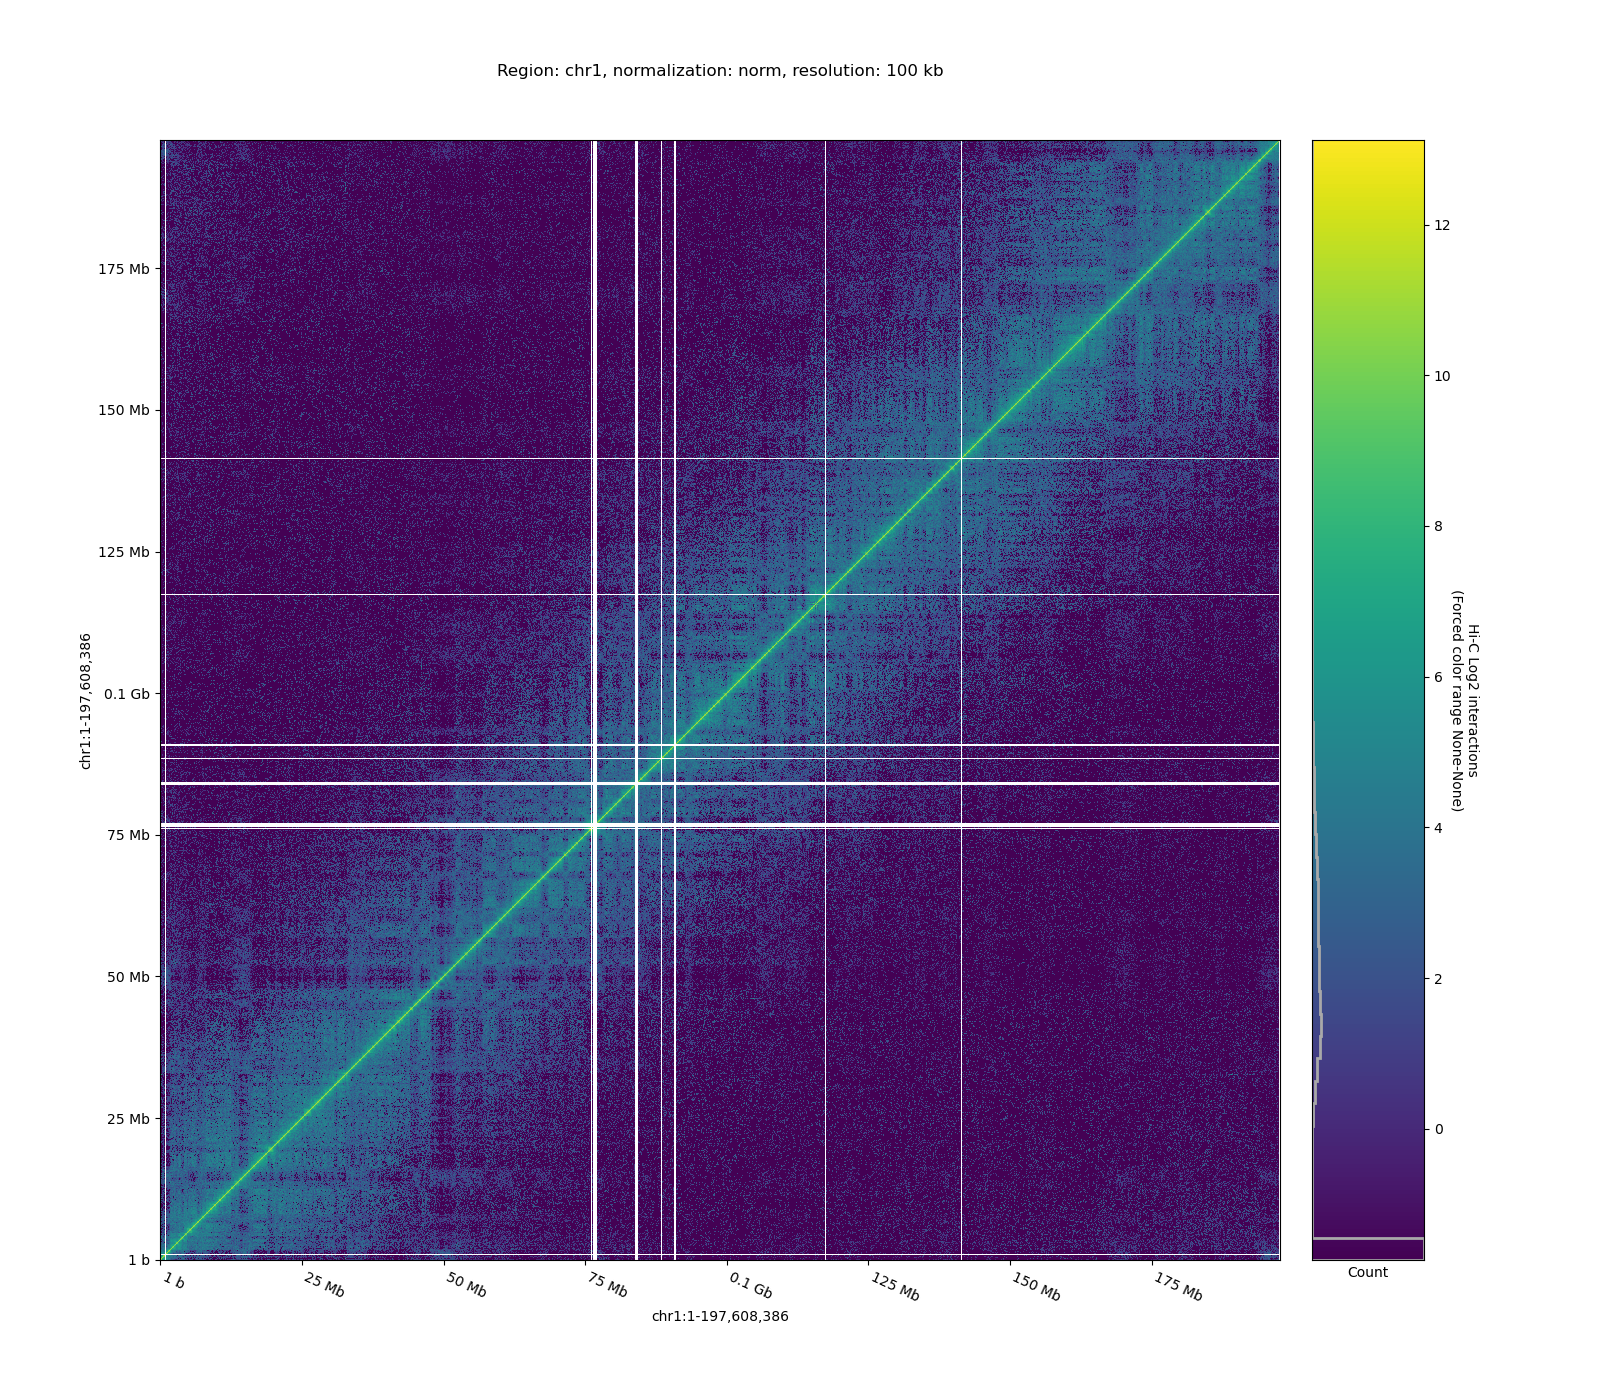
Example matrices (open locally):
- Raw Hi-C matrix
- Normalized Hi-C matrix
Congratulations, you finished the exercise!